Creating and Understanding the Fulfillment Workflow
This tutorial aims to guide you through the process of creating a fulfillment workflow to manage the disabling of multiple accounts. First, the workflow receives a list of Business Request Items and performs the disable operation on each. Additionally, it checks basic logic, such as verifying if there are any accounts to disable using line rules.
To create the workflow, we will follow these steps:
- Use the fulfillment workflow template available in Workflow Studio.
- Familiarize yourself with the basic structure and activities of the provided template.
- Add code/operation base activity to disable multiple accounts.
- Compile and publish the workflows.
Create a Fulfillment Workflow
In this example, our goal is to create a fulfillment workflow that can handle disabling all input accounts. Follow the instructions below to develop the workflow.
- Login to Workflow Studio.
- Go to your Demo folder or any folder you have created containing subfolders: Workflows > Application.
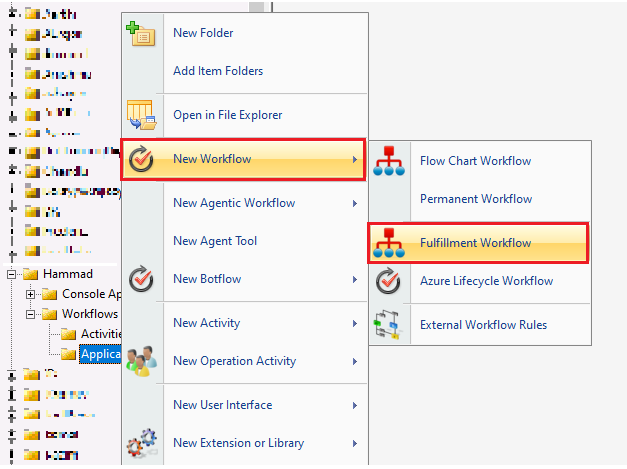
- Right-click on the Application folder in Workflow Studio and select New Workflow > Fulfillment Workflow from the context menu to create a new fulfillment workflow.
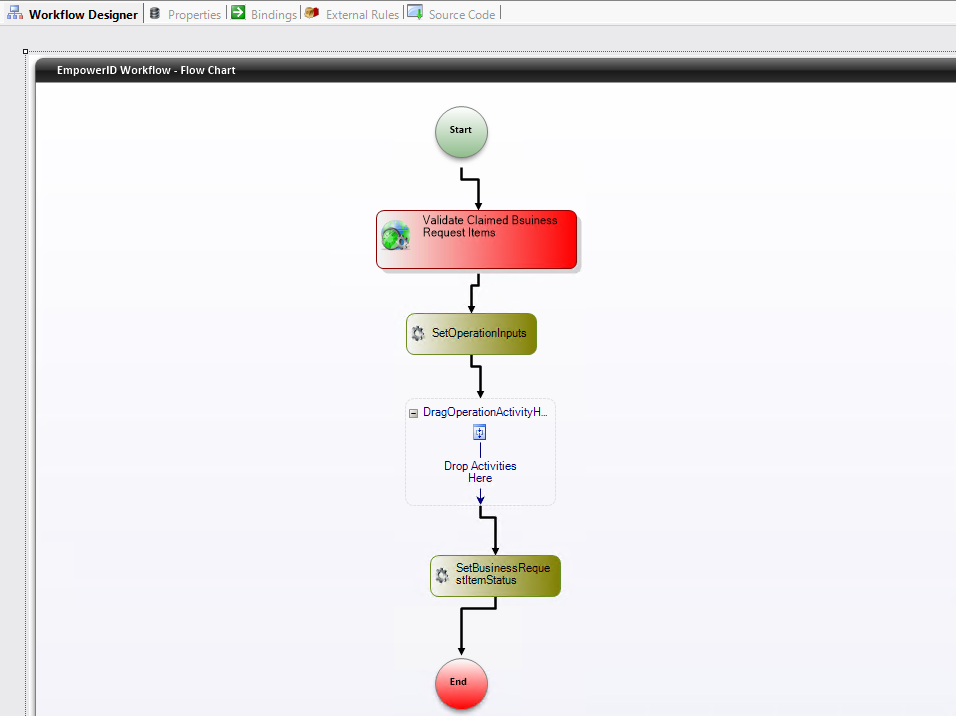
Upon creation, you will see the fulfillment workflow with the following default activities. Here is a brief summary of these activities:
-
ValidateClaimedBusinessRequestItems:
Validates the business request items associated with incoming calls (from consoles, APIs, etc.). It retrieves data from the database to verify that the business request items exist, haven’t been tampered with, and are in the appropriate state (e.g., "ready for fulfillment") to be processed by the workflow. This activity also updates the Fulfillment Process ID for the business request item to indicate the workflow instance that is processing the request. -
SetOperationInputs:
This step within the workflow extracts necessary data from business request items and transforms it into a format suitable for use as input parameters for the chosen operation activity. -
DragOperationActivitiesHere:
A placeholder where you can drag and drop additional activities into the workflow (e.g., Operation Base Activities, System Code Activity, etc.). -
SetBusinessRequestItemStatus:
Sets the execution status of the business request items, indicating whether the operation was successful or not.
- Save the workflow by clicking on the Save icon in the toolbar and provide a suitable name for the fulfillment workflow. Once saved, the workflow will reload and display the default activities.
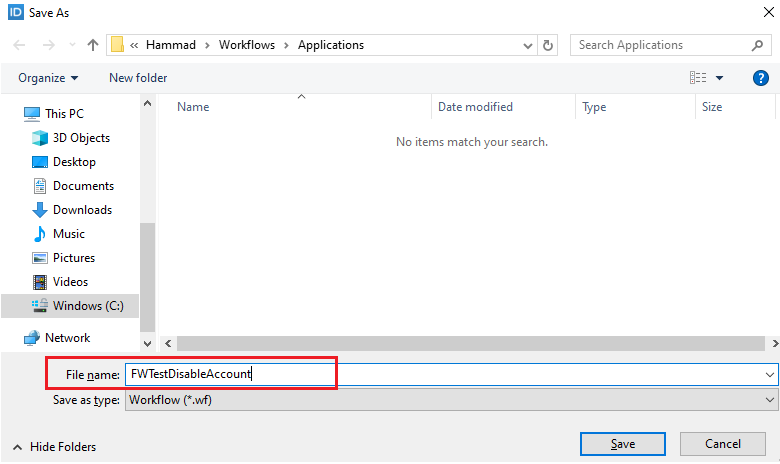
You may notice that I used 'FW' followed by the workflow name. This is the naming convention we typically use for fulfillment workflows, though it is not mandatory. Start with the prefix 'FW' followed by a descriptive name that reflects the workflow's action. For example, a workflow that deletes accounts would be named 'FW Delete Accounts. Additionally, if the workflow is custom-built for a particular customer, it's advisable to include a customer-specific prefix before the "FW" prefix. This prefix can be either the customer's full name or an abbreviation. For instance, a workflow designed for a customer named "Acme Corporation" could be named "AC FW Delete Accounts" (using the abbreviation "AC") or "Acme Corporation FW Delete Accounts"
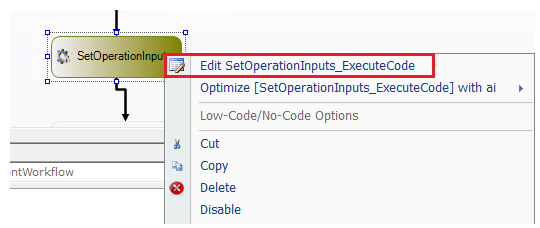
- Double-click the SetOperationInputs activity or right-click on the activity and select Edit SetOperationInputs_ExecuteCode. This will open the code editor window.
- Ensure that your workflow name (instead of the template name) is set in all three locations. Repeat the same steps for the SetBusinessRequestItemStatus activity.

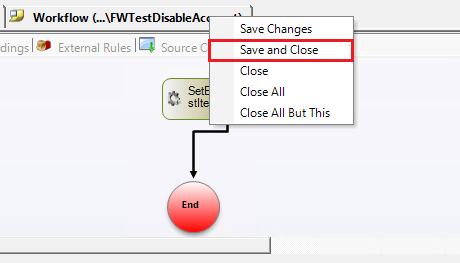
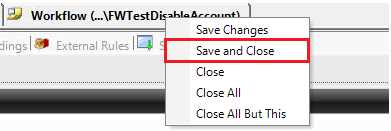
- If the workflow name is missing in any of the three locations for both the SetOperationInputs and SetBusinessRequestItemStatus activities, save and close the workflow window. Once closed, reopen the workflow to update the workflow name in all locations.
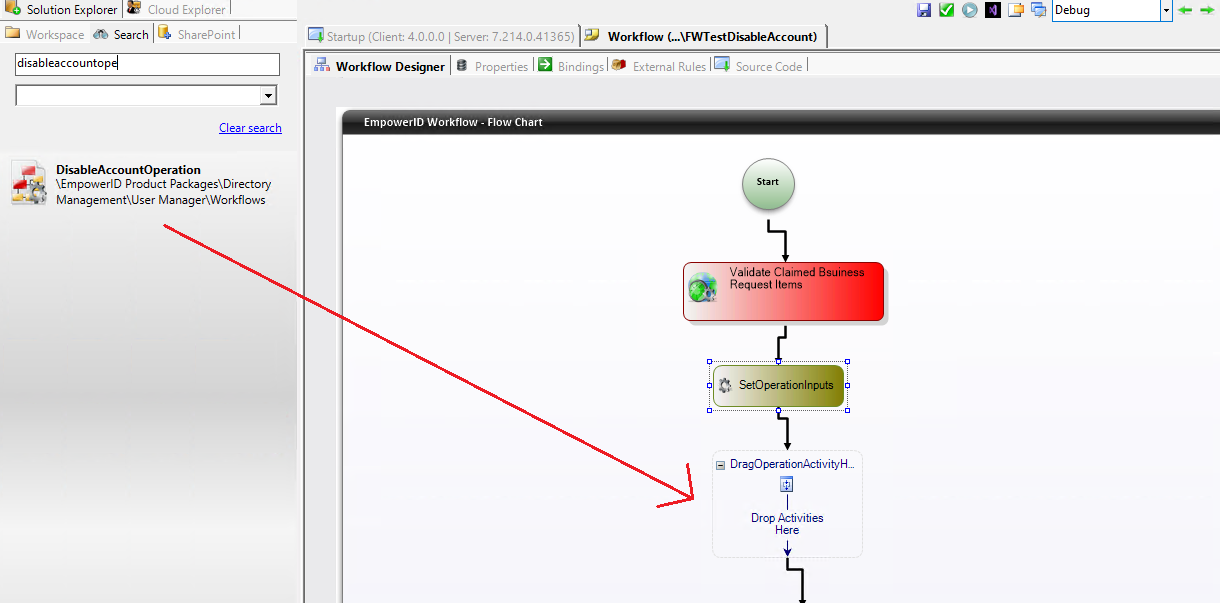
- We will perform the disable account operation using the default operation available in EmpowerID. To find the necessary activity, go to the Activities pane or use the Search tab. Enter the relevant search text and select the DisableAccountOperation from the search results. Then, drag and drop the activity to the Drag Operation Activities Here placeholder.
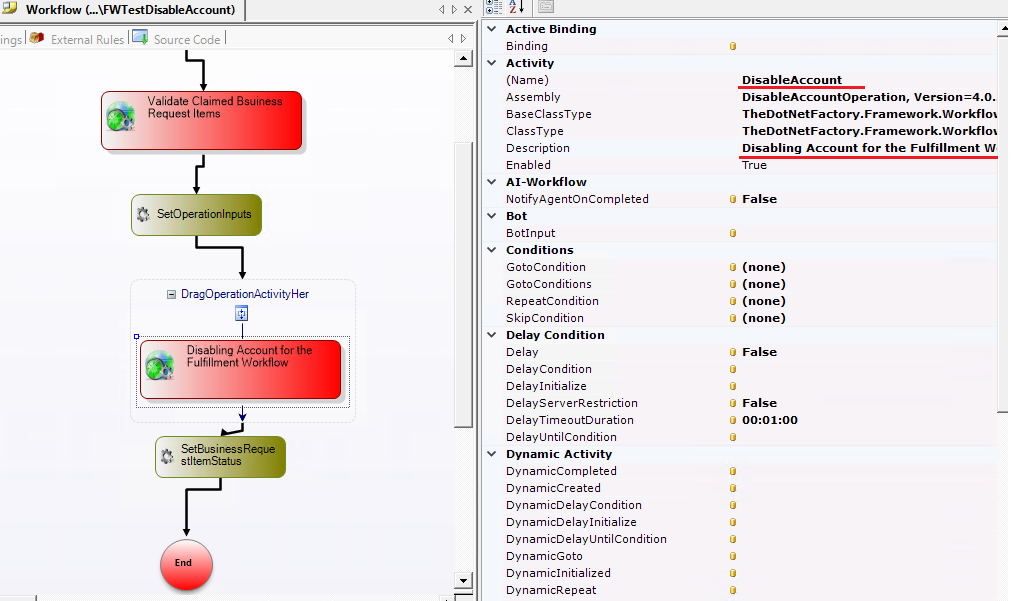
- Click on the newly added operation activity and provide a suitable name and description. In the Name field, enter DisableAccount, and in the Description text box, enter "Disabling account for the Fulfillment workflow".
- Click the Visual Studio icon in the top bar to open the workflow or solution in Visual Studio.

- Before making changes in Visual Studio, save and close the workflow window in Workflow Studio.
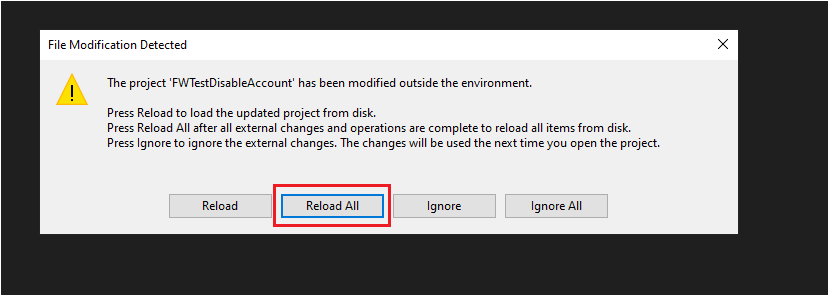
- Return to Visual Studio. If a File Modification Detected popup appears, click Reload All.
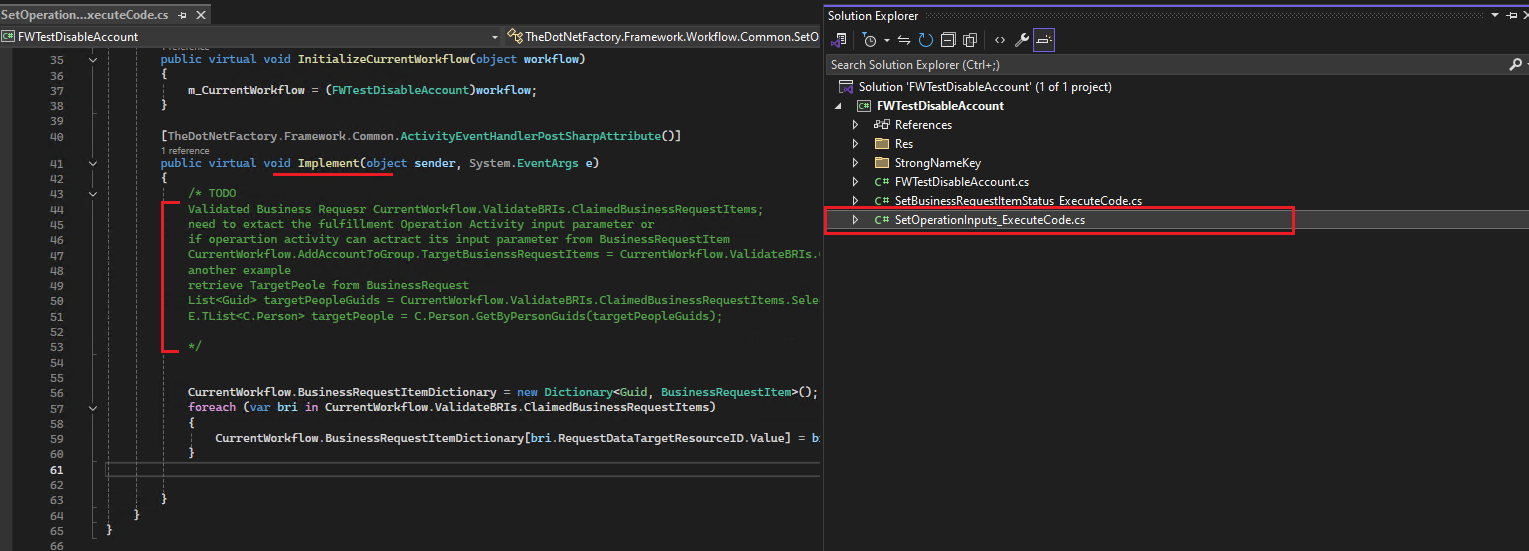
- In Solution Explorer, double-click SetOperationInputs_ExecuteCode.cs and scroll down to the Implement method. You will see commented code with examples for validating the Business Request and retrieving items.
- Add the following code after the end of the comments:
List<Guid> accountGuids = CurrentWorkflow.ValidateBRIs.ClaimedBusinessRequestItems
    .Select(a => a.RequestDataTargetResourceID.Value)
    .Distinct()
    .ToList();

var targetAccounts = new E.TList<Account>(C.Account.GetByAccountGuids(accountGuids)
    .Where(a => !a.Disabled)
    .ToList());

CurrentWorkflow.DisableAccount.TargetAccounts = targetAccounts;
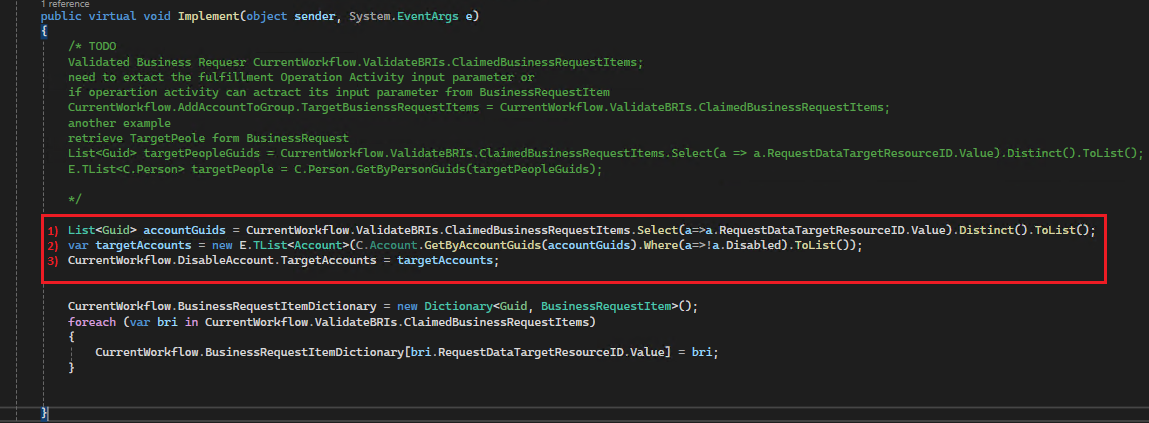
✔ The above lines of code are the recommended way to retrieve data from the database in bulk.
The above code snippet demonstrates the following key concepts:
Data Retrieval from Business Request Item: In the first line, we retrieves data from BusinessRequestItems and stores it in a list of type Guid.
Efficient Data Retrieval: In the second line, it utilizes bulk retrieval methods (GetByAccountGuids) to minimize database interactions.
Pre-Processing and Filtering: In the second line, it filters the retrieved accounts to exclude those already disabled, preventing unnecessary operations.
Preparation for Bulk Operations: In the third line, it constructs a list of enabled accounts to pass to the DisableAccount operation activity, which performs the disabling action in bulk.
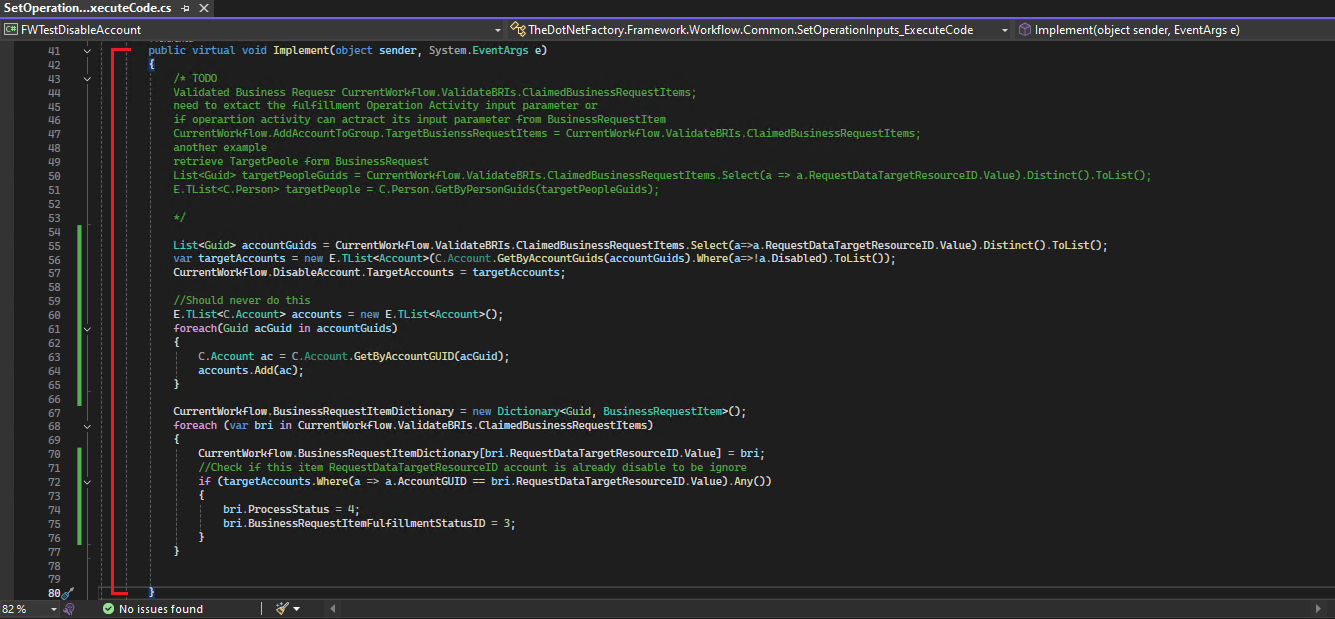
The approach outlined below is not recommended. Refer to the following code snippet for clarification.
      //Should never do this
       E.TList<C.Account> accounts = new E.TList<Account>();
       foreach(Guid acGuid in accountGuids)
       {
           C.Account ac = C.Account.GetByAccountGUID(acGuid);
           accounts.Add(ac);
       }
The issue with this approach is that it results in a separate database call for each account GUID. If the accountGuids list contains 100 GUIDs, the code will execute 100 individual database queries. This generates significant overhead and slows down the workflow considerably, especially in scenarios where multiple instances of the workflow might be running concurrently. Therefore, we should use bulk retrieval methods. If they do not exist for a specific component, ask the EmpowerID developer to create one for you.
- Add the following code after this line CurrentWorkflow.BusinessRequestItemDictionary[bri.RequestDataTargetResourceID.Value] = bri;
 //Check if this item RequestDataTargetResourceID account is already disable to be ignore
 if (targetAccounts.Where(a => a.AccountGUID == bri.RequestDataTargetResourceID.Value).Any())
 {
     bri.ProcessStatus = 4;
     bri.BusinessRequestItemFulfillmentStatusID = 3;
 }
- This completes the implementation of the Implement method in the SetOperationInputs_ExecuteCode.cs class, which is then passed to the Operation Activity.
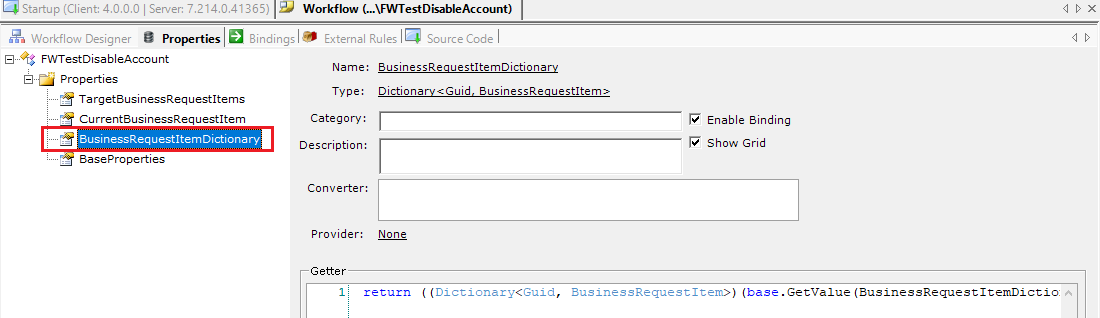
BusinessRequestItemDictionary plays the crucial role in optimizing fulfillment workflows. This dictionary acts as a bridge, linking the data within business request items (BRIs) to the specific actions performed by operations during the fulfillment process. Understanding its purpose and usage is key to creating efficient and scalable workflows.
The Challenge: Connecting BRIs and Operations in Bulk
Fulfillment workflows often involve processing multiple BRIs concurrently. Each BRI might contain data related to a specific resource, like an account GUID, and an intended action, such as disabling the account. The challenge lies in efficiently mapping this BRI data to the relevant operation and tracking the outcome of each operation on a per-BRI basis.
Imagine a scenario where a workflow needs to disable 100 accounts. Simply looping through the BRIs and disabling accounts individually would result in 100 separate database calls, significantly hindering performance. To overcome this, the system employs bulk operations, enabling the processing of multiple resources with a single database interaction. However, this efficiency introduces a new challenge: how to correlate the results of the bulk operation back to the individual BRIs they originated from.
The Solution: BusinessRequestItemDictionary as a Mapping Tool
The BusinessRequestItemDictionary addresses this challenge by providing a structured way to link BRIs to their corresponding operations and track their execution status. It operates as a key-value store, where
Key: The key is typically a unique identifier representing the resource being acted upon by the operation. In the case of disabling accounts, this would be the account GUID. However, the key can also be a composite string combining multiple identifiers, particularly in scenarios involving relationships between resources, such as adding an account to a group. This composite key ensures accurate mapping when multiple operations might involve the same resource.
Value: The value associated with the key is the BRI itself. This direct association allows the workflow to easily retrieve the BRI corresponding to a specific operation result, enabling granular status updates.
-
In Solution Explorer, open the SetBusinessRequestItemStatus_ExecuteCode.cs file. If you see red wiggly lines, it means it is pointing to the wrong workflow, so you need to replace it with your workflow name.
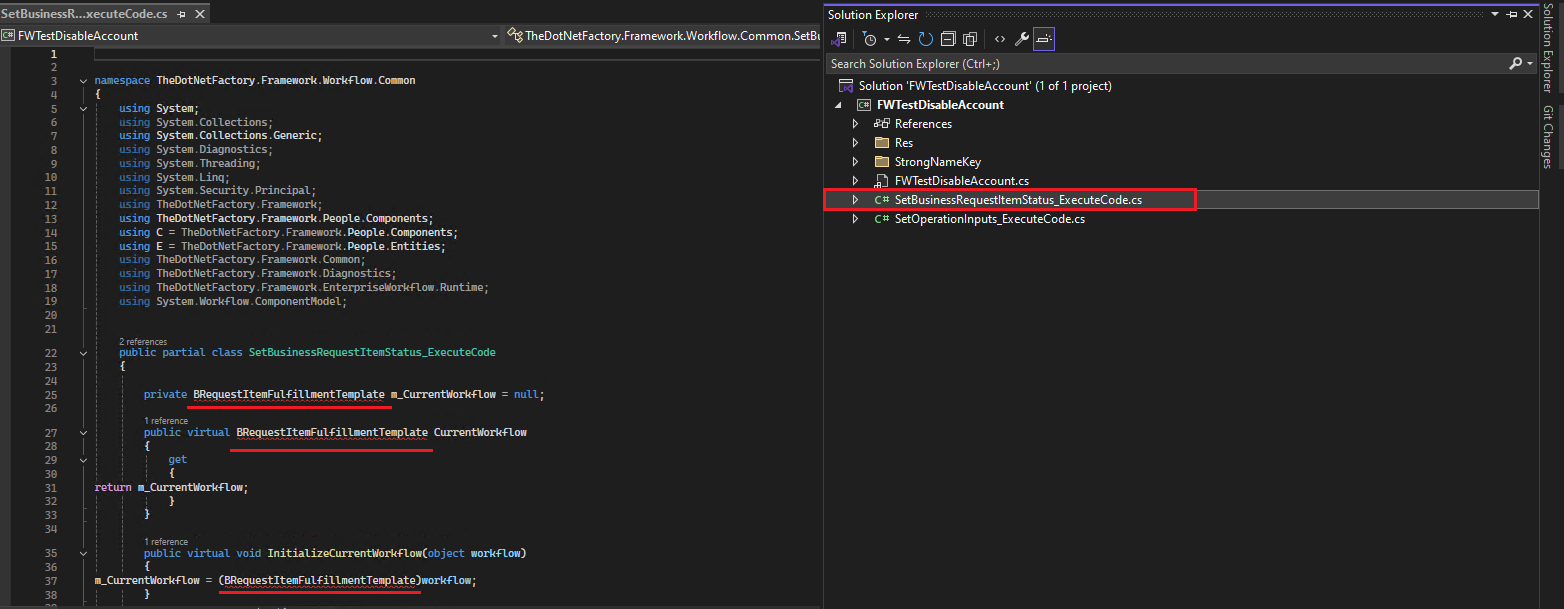
-
After replacing BRRequestItemFulfillmentTemplate with your workflow name, the code should look like this.

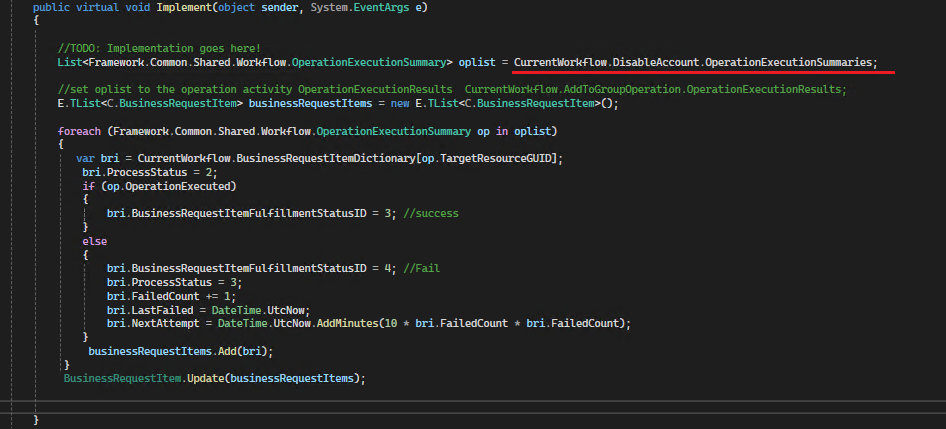
The code in SetBusinessRequestItemStatus_ExecuteCode.cs is executed after your Operation Base Activity:
- Add the following code snippets to the Implement method in the SetBusinessRequestItemStatus_ExecuteCode.cs file.
List<Framework.Common.Shared.Workflow.OperationExecutionSummary> oplist = CurrentWorkflow.DisableAccount.OperationExecutionSummaries;
OperationExecutionSummary
Operation Activities: Within a fulfillment workflow, specific tasks are often carried out using operation activities. These are pre-built components within EmpowerID that encapsulate the logic for performing actions like disabling accounts, adding users to groups, or sending emails. To learn more about operation activities refer to this documentation Operation Base Activities
Bulk Execution:
One of the key characteristics of operation activities is their ability to handle multiple resources at once. This bulk execution capability is crucial for scalability, as it avoids the need to perform the same action repeatedly for each individual resource. Capturing Individual Operation Outcomes.
Atomic Nature of Bulk Operations:
While operation activities execute actions in bulk, it's essential to remember that each action on an individual resource within that bulk operation can have a different outcome. For instance, while attempting to disable 100 accounts, some might already be disabled, while others might be successfully disabled, and some might fail due to various reasons. To accurately reflect the outcome of a bulk operation, the fulfillment workflow needs a mechanism to track the result of each individual action performed on each resource. This is where OperationExecutionSummary comes into play.
Output from Operation Activities:
Whenever an operation activity is executed within a fulfillment workflow, it returns a list of OperationExecutionSummary (This behavior of the operation activity is independent of the fulfillment workflow; it always returns OperationExecutionSummaries for bulk operations, no matter where it is used) This list contains a separate entry for each resource that was processed during the bulk operation. Here, we are using the OperationExecutionSummaries to accurately update the status of each BRI.
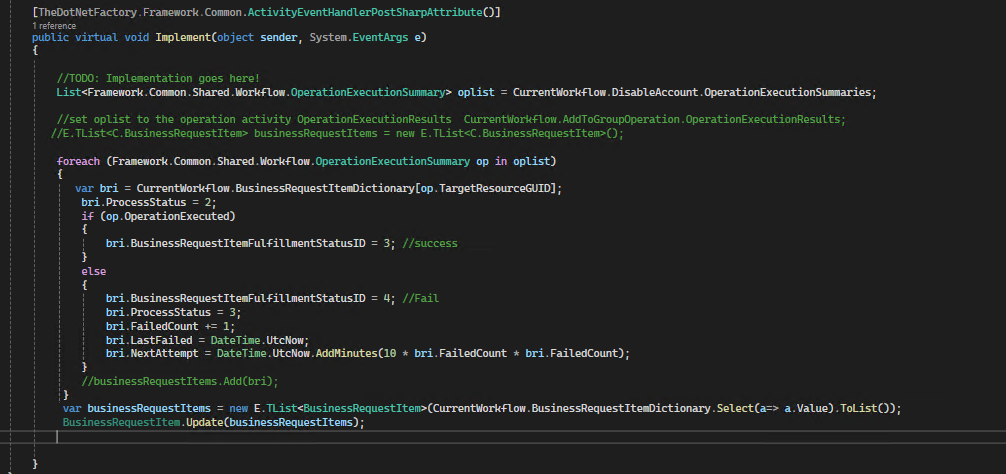
- Remove the line of code businessRequestItems.Add(bri); from inside the foreach loop, and instead, add the following line
var businessRequestItems = new E.TList<BusinessRequestItem>(CurrentWorkflow.BusinessRequestItemDictionary.Select(a => a.Value).ToList());
just before BusinessRequestItem.Update(businessRequestItems);.
- Here is the complete code for the Implement method:
 //TODO: Implementation goes here!
 List<Framework.Common.Shared.Workflow.OperationExecutionSummary> oplist = CurrentWorkflow.DisableAccount.OperationExecutionSummaries;
	//set oplist to the operation activity OperationExecutionResults  CurrentWorkflow.AddToGroupOperation.OperationExecutionResults;
  //E.TList<C.BusinessRequestItem> businessRequestItems = new E.TList<C.BusinessRequestItem>();
	foreach (Framework.Common.Shared.Workflow.OperationExecutionSummary op in oplist)
 {
    var bri = CurrentWorkflow.BusinessRequestItemDictionary[op.TargetResourceGUID];
     bri.ProcessStatus = 2;
     if (op.OperationExecuted)
     {
         bri.BusinessRequestItemFulfillmentStatusID = 3; //success
     }
     else
     {
         bri.BusinessRequestItemFulfillmentStatusID = 4; //Fail
         bri.ProcessStatus = 3;
         bri.FailedCount += 1;
         bri.LastFailed = DateTime.UtcNow;
         bri.NextAttempt = DateTime.UtcNow.AddMinutes(10 * bri.FailedCount * bri.FailedCount);
     }
		//businessRequestItems.Add(bri);
  }
     var businessRequestItems = new E.TList<BusinessRequestItem>(CurrentWorkflow.BusinessRequestItemDictionary.Select(a=> a.Value).ToList());
	   BusinessRequestItem.Update(businessRequestItems);
In the above code inside the foreach loop, it iterates through each OperationExecutionSummary in the oplist. For every summary, it performs the following:
Identify the Corresponding BRI: Using the TargetResourceGUID from the OperationExecutionSummary object, the code retrieves the associated BRI from the BusinessRequestItemDictionary. This dictionary acts as a mapping between resource GUIDs (account GUIDs in this case) and their respective BRIs.
Checking Operation Success: The code then checks the OperationExecuted flag within the OperationExecutionSummary. This flag determines whether the disable operation was successful for the specific account represented by the summary. If the OperationExecuted flag is true, indicating success, If the OperationExecuted flag is false, meaning the disable operation failed for the account
At the end of the code commits all BRI changes in a single bulk update operation, avoiding the performance issues associated with individual updates.
We populate BusinessRequestItemDictionary in the SetOperationInputs_ExecuteCode class and extract values from it in the SetBusinessRequestItemStatus_ExecuteCode class. This dictionary is accessible in both classes because it is defined as a property at the workflow level. To learn more about properties, refer to the documentation for Properties.
Compile and Publish the Workflow
We compile and publish the Fulfillment Workflow in Workflow Studio the same way you publish your UI workflows. Once published from Workflow Studio, also publish it through the EmpowerID Web UI.

The Fulfillment Workflow is fundamentally linked to an Item Type Action. This linkage is configured in the No Code Flows section of the EmpowerID system, which specifies the workflow to be executed when a Business Request Item (BRI) of that Item Type Action is approved or rejected. For more details, refer to the No Code Flows documentation.
Debug the Fulfillment Workflow
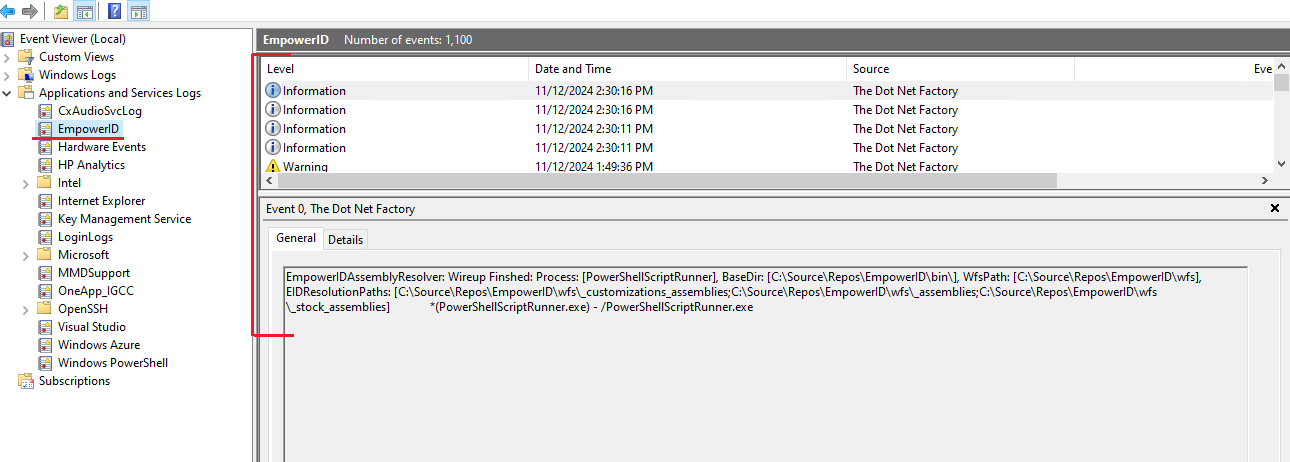
a- To debug the Fulfillment Workflow tracing is a crucial debugging tool. Tracing provides a record of the workflow's execution path and the values of variables at various stages. By examining the trace logs, you can gain valuable insights into the workflow's behaviour and pinpoint potential issues. You can add tracing to your code like this
TdnfTrace.Current.TraceEvent(System.Diagnostics.TraceEventType.Information, 1234, "Starting the Fulfillment Workflow");
and then check these logs in DebugView++ or Event Viewer.
when you are adding tracing in any operation, API, class library etc, wherever applicable please add a prefix [Process_Name] saying which process or operation or WF this log concerns to, this will help filter logs on the containers easily. If it is common code, you can use a generic prefix. Otherwise, we will have to spend a considerable amount of time sifting through the extensive logs that are generated.

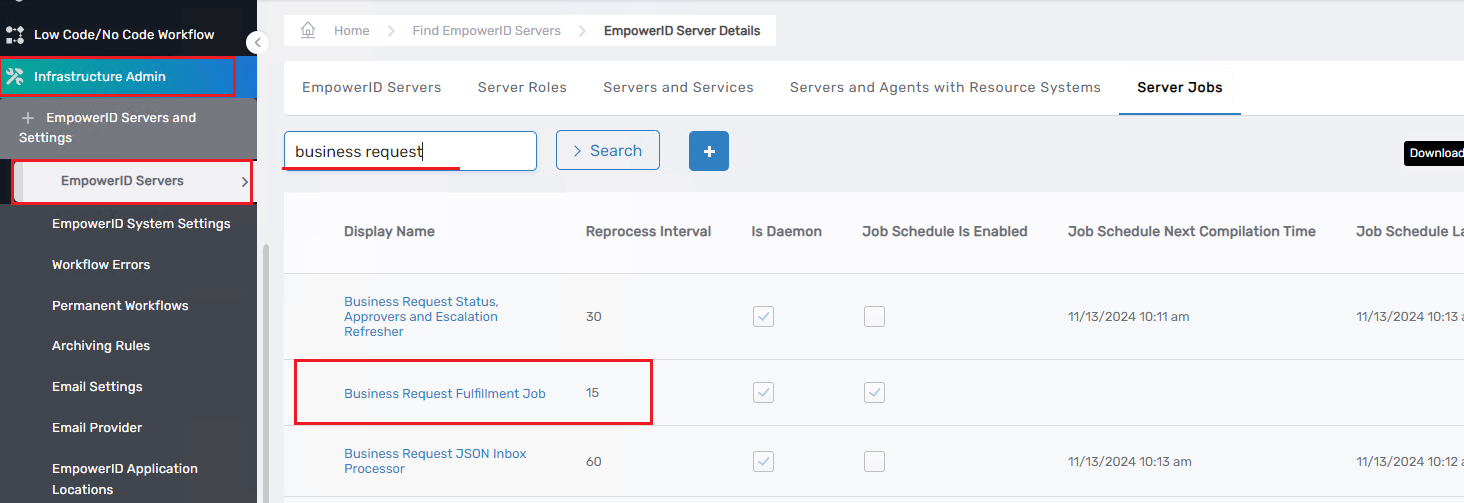
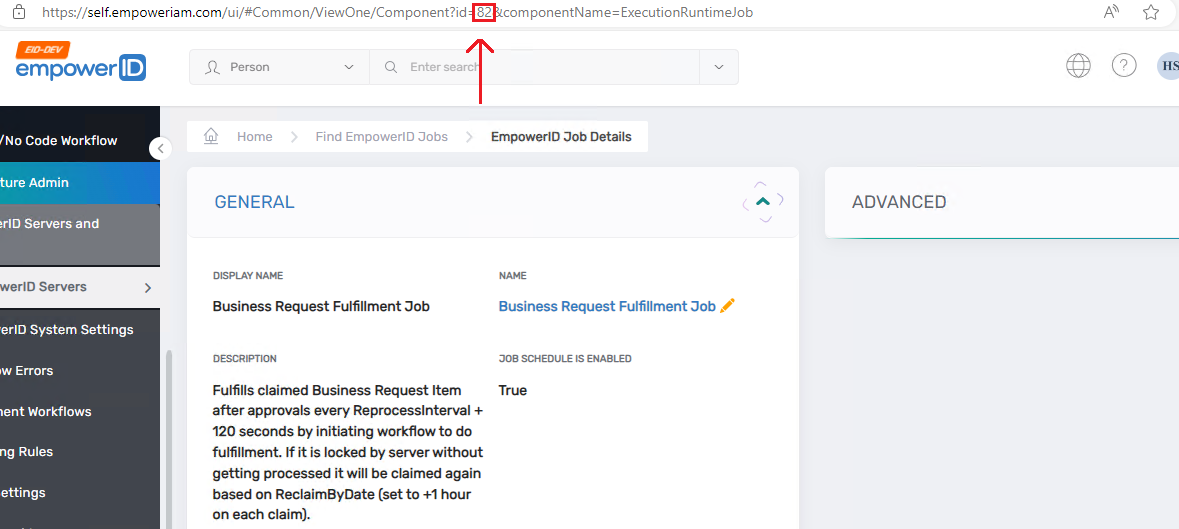
b - Another way to debug the Fulfillment workflow is to use a separate machine. In the latest version, this method is not supported. To proceed, go to Infrastructure Admin → EmpowerID Servers, then click on the Server Jobs tab. In the search box, type “business request,” select the Business Request Fulfillment Job, and note the ID from the URL.
c - Open Task Manager and go to the Services tab. From there, stop the EmpowerID Worker Role Service.

d - Open the Fulfillment Workflow .cs file in Visual Studio, and place a breakpoint where needed.
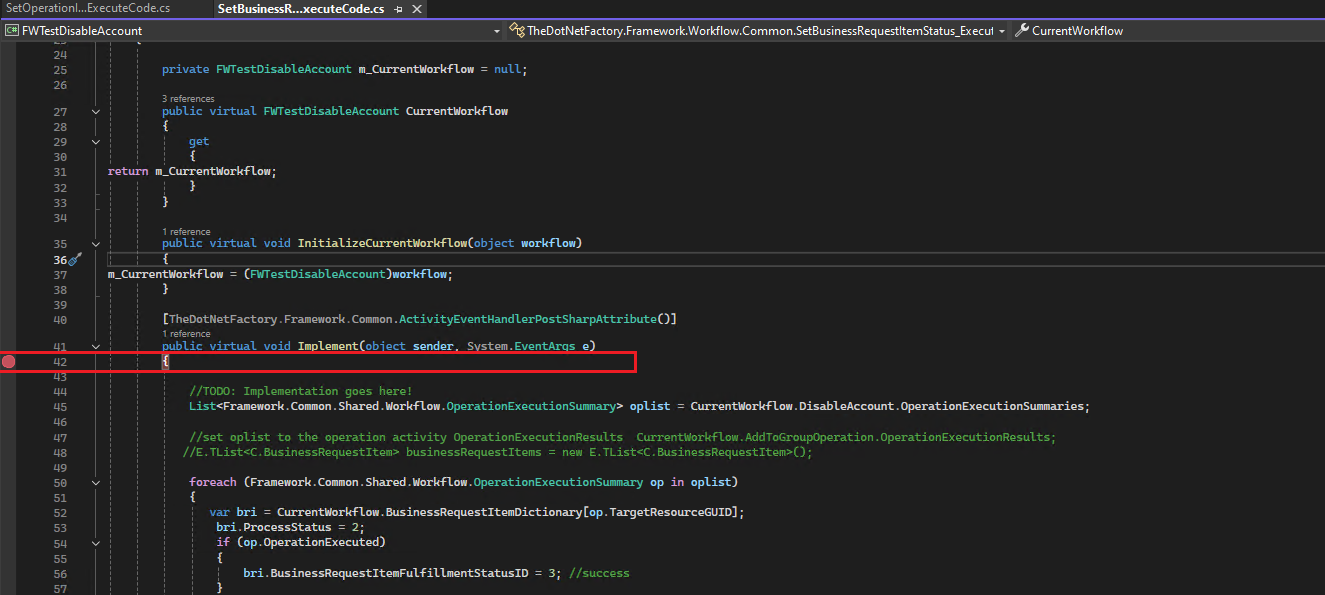
e - Open the Command Prompt, navigate to the bin folder as shown in the screenshot below, and run the following command by hitting enter.
CustomConnectorUtility.exe --runJob --jobID=82 --debug

f - Attach to the w3wp processes in Visual Studio, then return to the Command Prompt and press Enter. Your breakpoint will be triggered in Visual Studio.
Summary
-
The first code shape SetOperationsInput (SetOperationInputs_ExecuteCode), where we identify the component to use, such as a group or account. For optimal performance, retrieve these items in bulk rather than one by one.
-
Next, pass the list to an operation activity, which allows bulk processing. There are many pre-built operation activities designed for bulk actions.This approach is recommended for efficiency.
-
We use a dictionary (BusinessRequestItemDictionary) to map component GUIDs to Business Request Items, which helps in tracking items during status updates. This dictionary allows for efficient lookup of the relevant BRI when updating its status based on the outcome of the operation activity
-
After executing the Operation Base Activity, we proceed to the second code shape SetBusinessRequestItemStatus (SetBusinessRequestItemStatus_ExecuteCode).
-
For each operation activity that supports bulk processing, an OperationExecutionSummary is returned, providing an execution summary.
-
It is then the developer’s responsibility to update the status and implement the logic for status updates. The developer needs to process the OperationExecutionSummary, use the BusinessRequestItemDictionary to find the corresponding BRIs, and update their statuses accordingly
-
Always perform bulk updates rather than single updates for each Business Request.
-
Publish the Workflow and link it with the Item Type Action.